Page 1 of 3 123 LastLast
Results 1 to 25 of 65

Thread: ABIT AW9D-MAX Insulation

  1. #1
    k|ngp|n/Sham my brothers
    Join Date
    Aug 2002
    Location
    Athens---Hellas
    Posts
    5,693

    Smile ABIT AW9D-MAX Insulation

    Here I'll upload pictures and details of how to insulate a mobo....
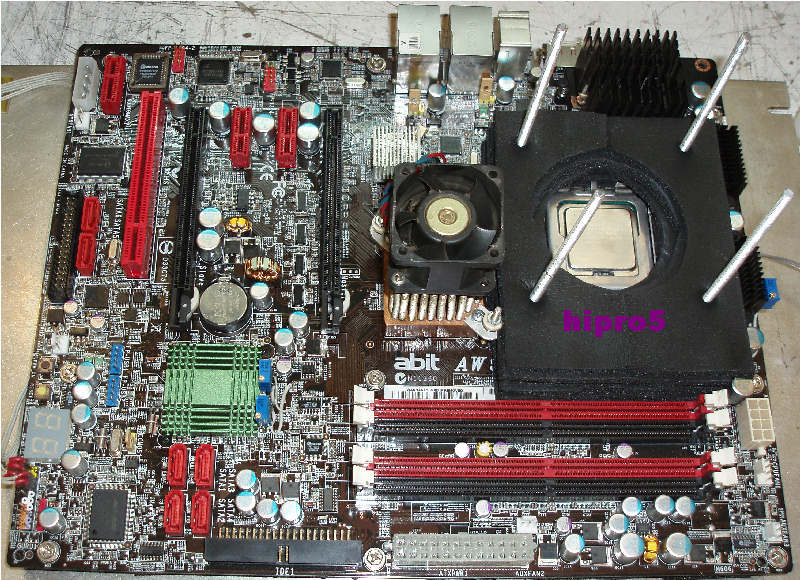
    The mobo I'll insulate for now is ABIT AW9D-MAX and the photos/details will be needed as a small insulation guide for new guys who want to come into subzero world...


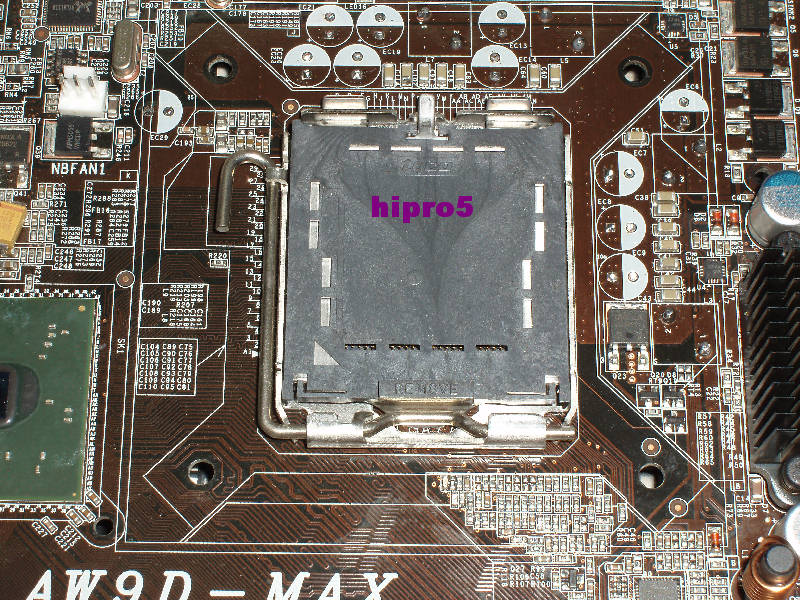
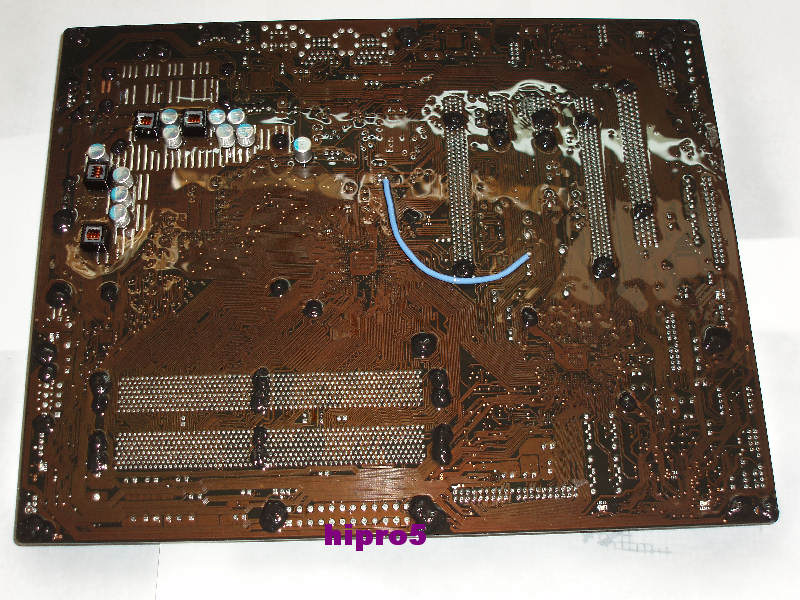
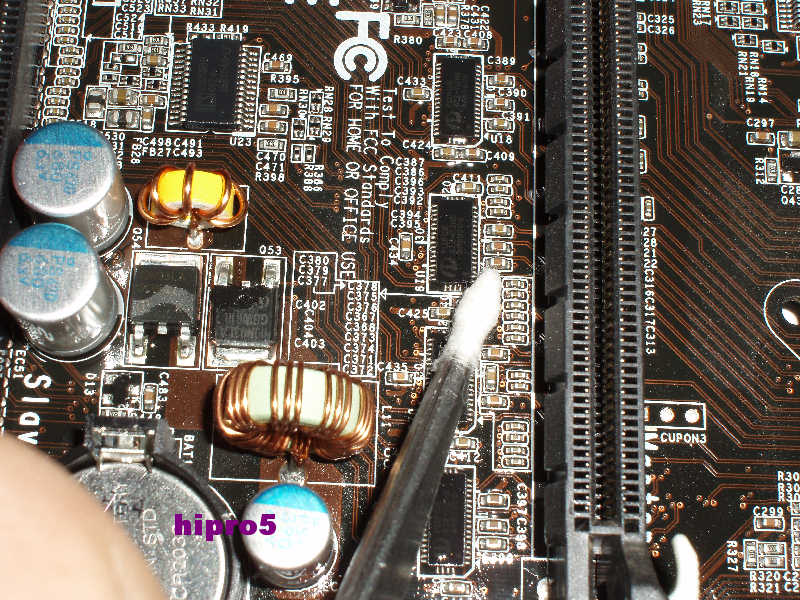
    Starting I have unsoldered ALL capacitors and chokes(coils) from the mobo which are around the socket 775 so as to make more "space" for insulation.........
    Of course don't do that cuz it's a bit difficult......
    In case that some one is interested about this as well, simply you NEED HIGH soldering temperature (over 450*C) so as to unsolder them....


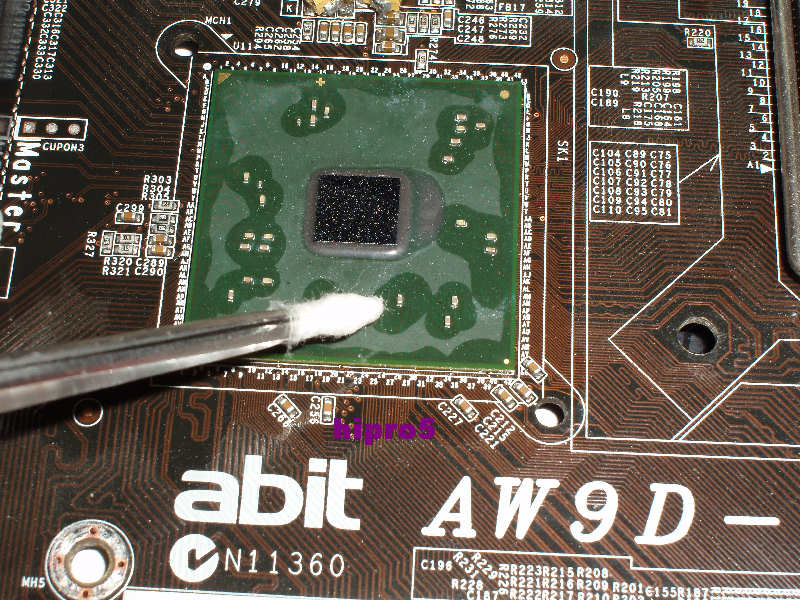
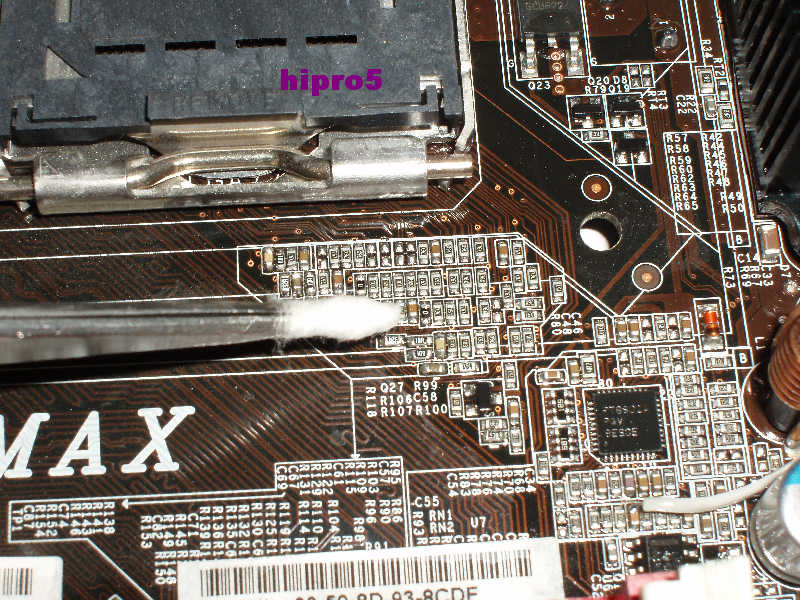
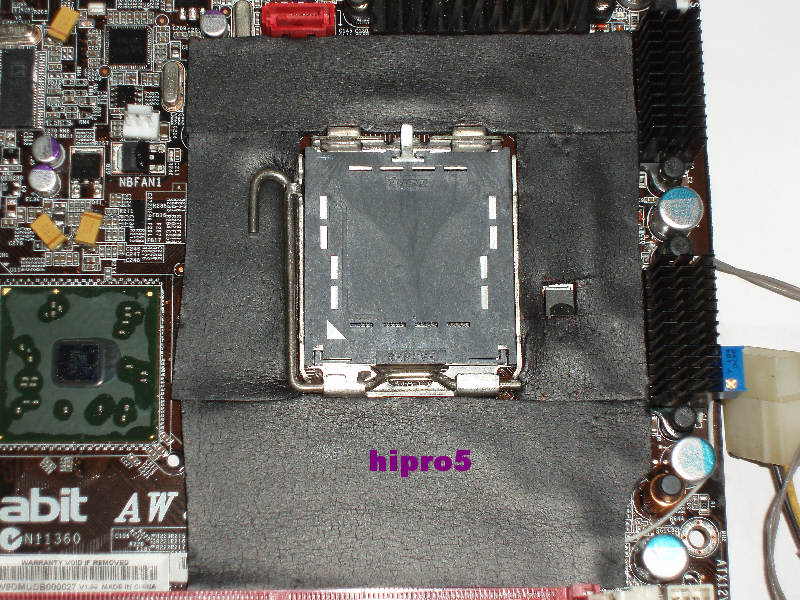
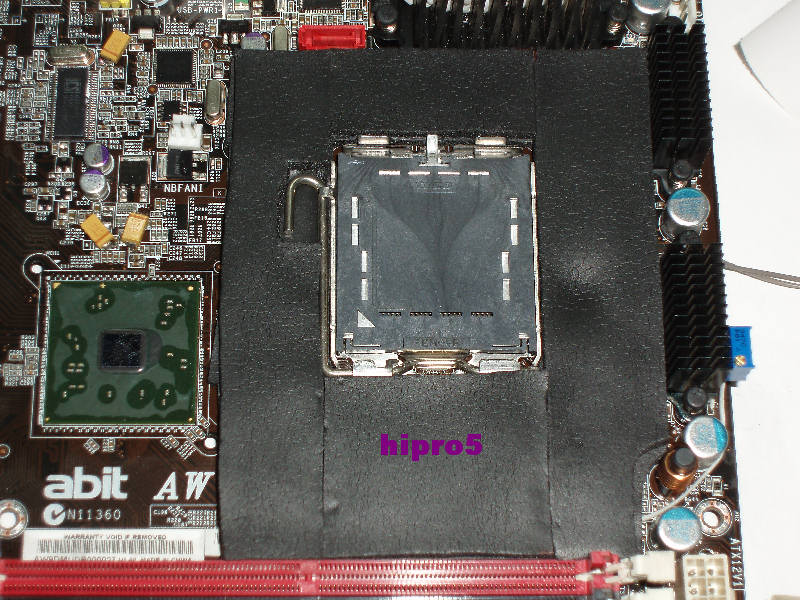
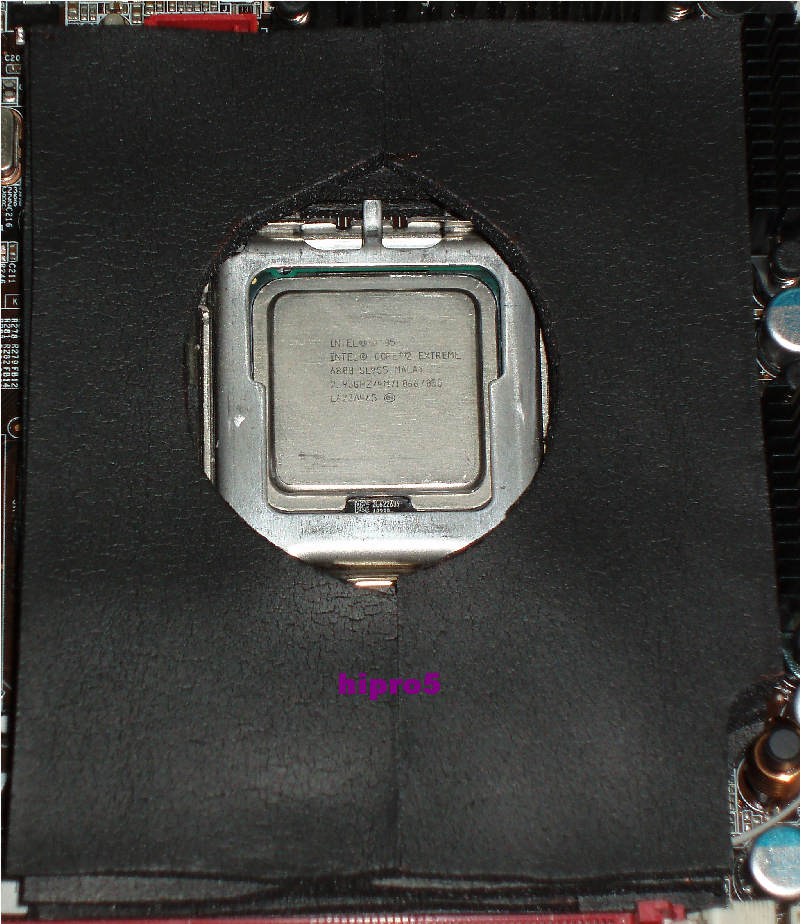
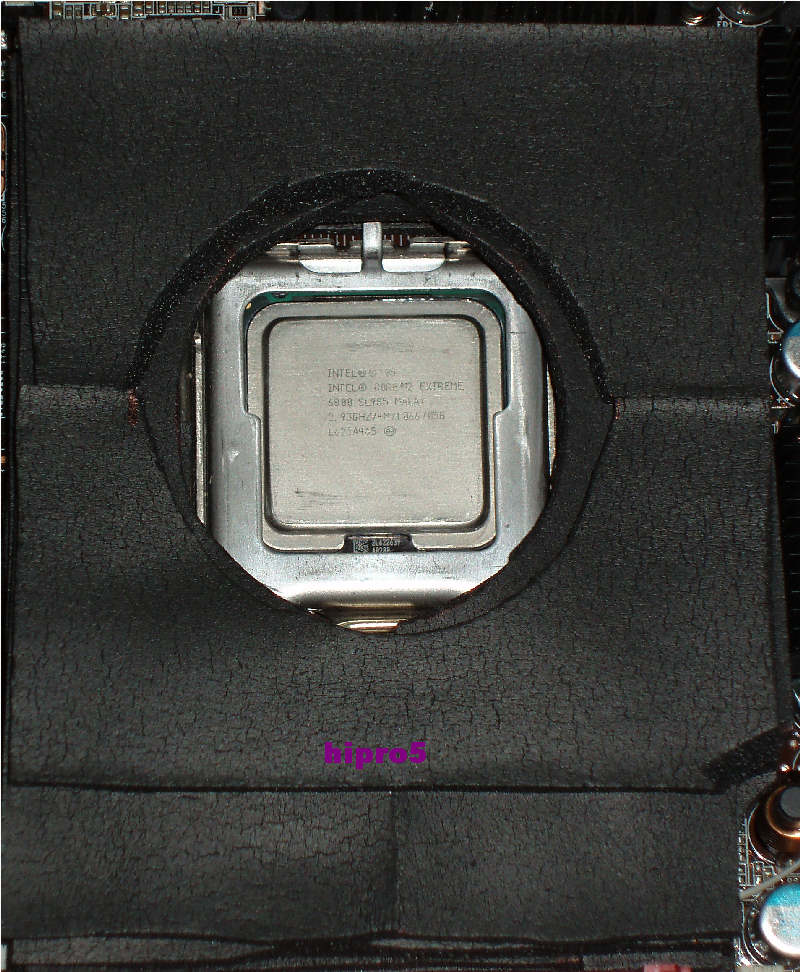
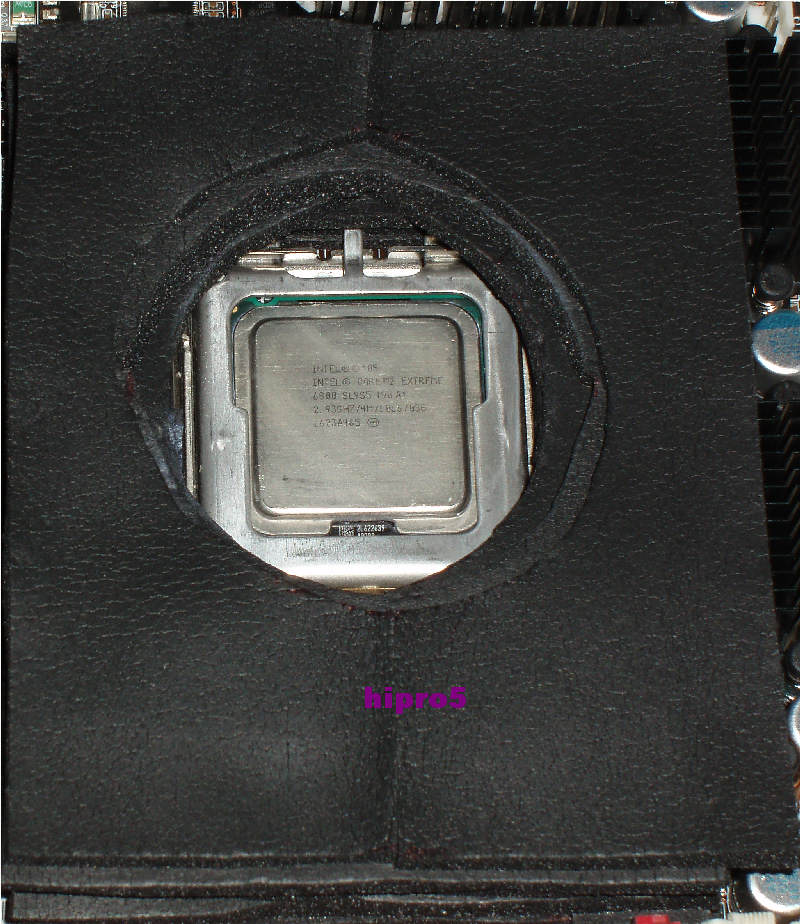
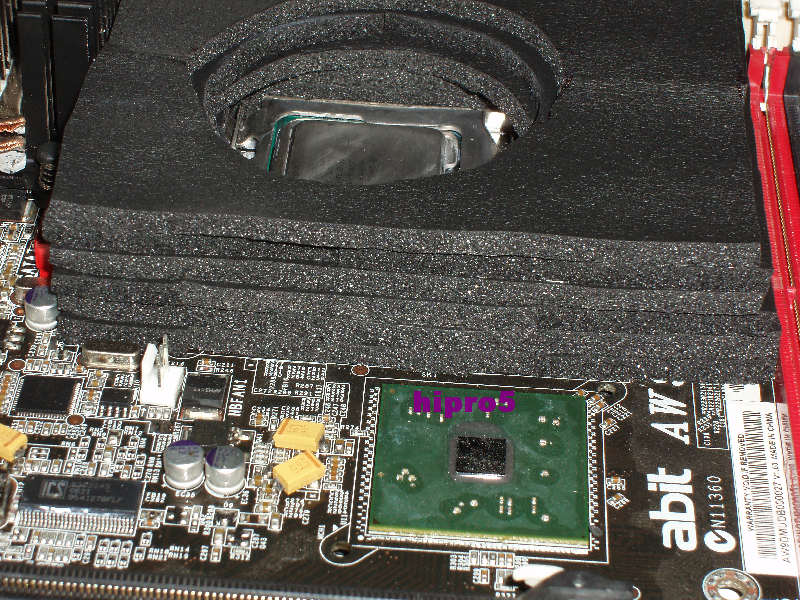
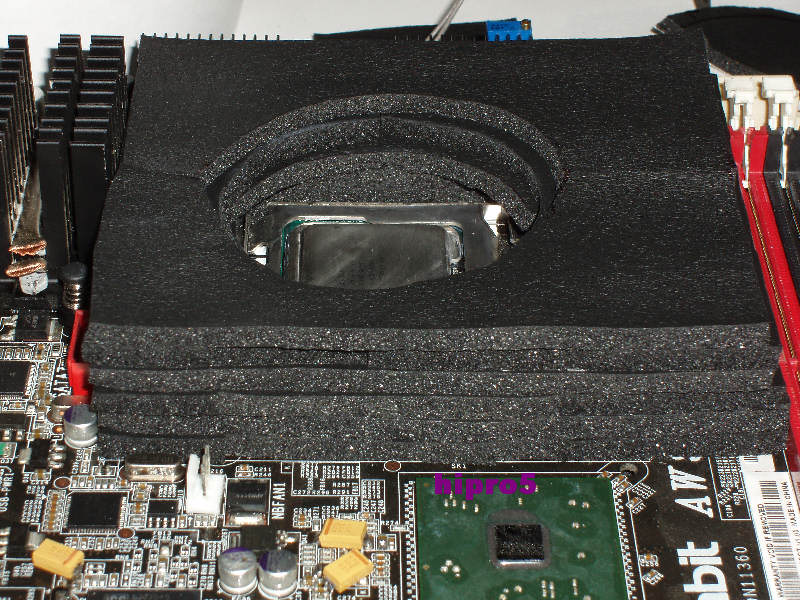
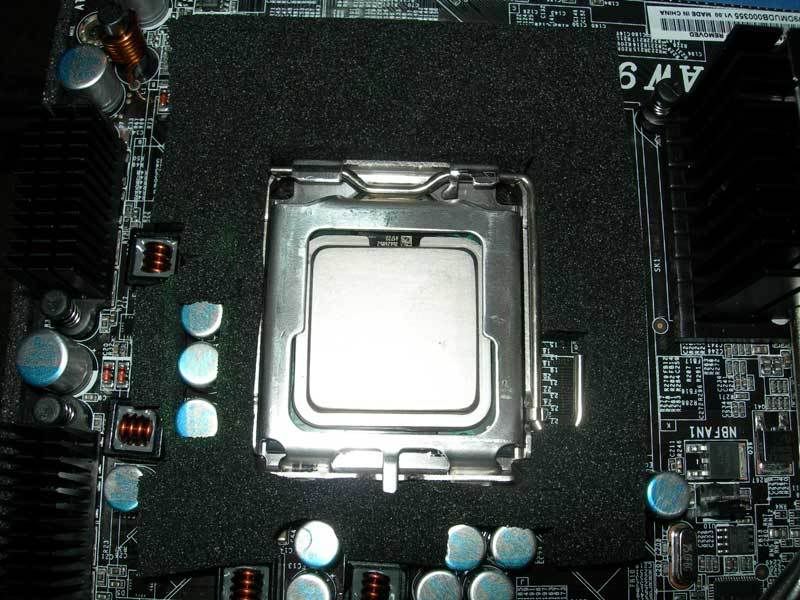
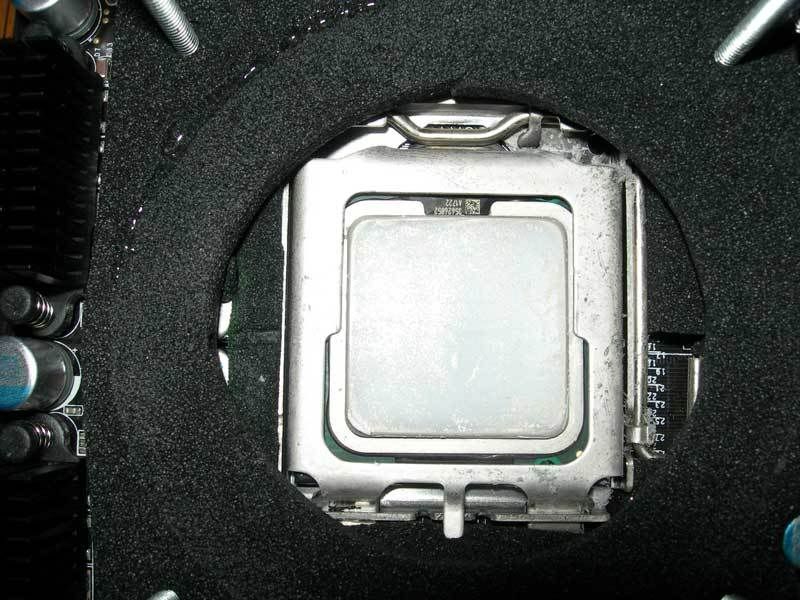
    Here's a shot of the socket 775 and the space we now have around it....


    OK.....You'll say: "Now that we have unsoldered the chokes and the capacitors, dosn't mobo needs them so as to work?"
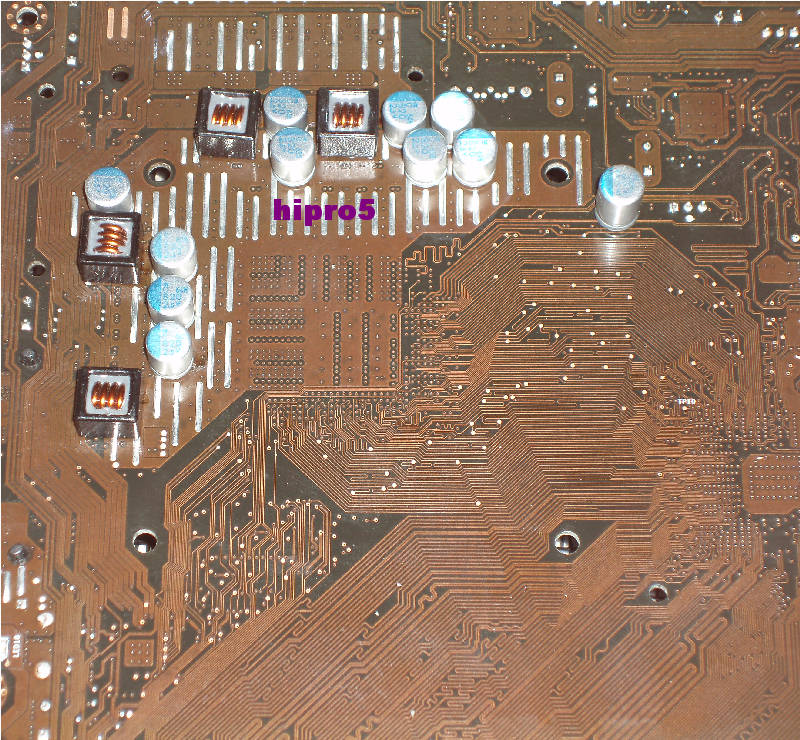
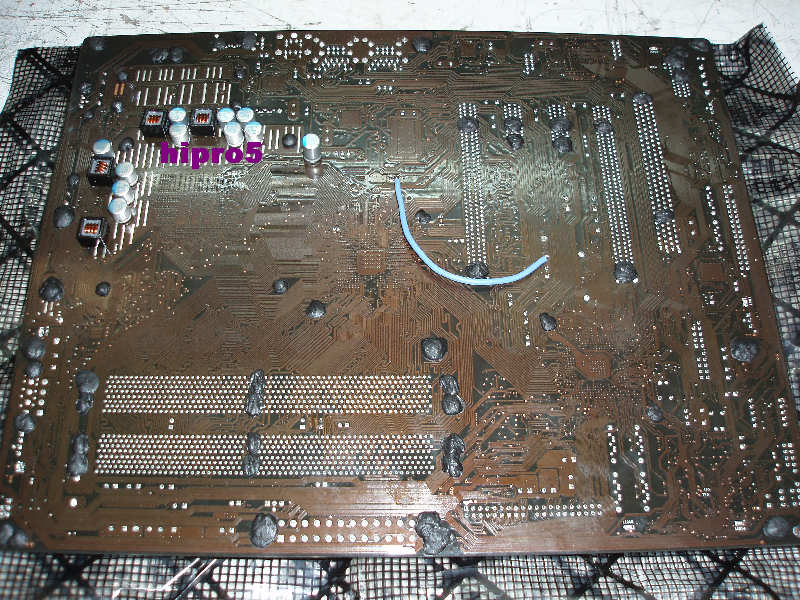
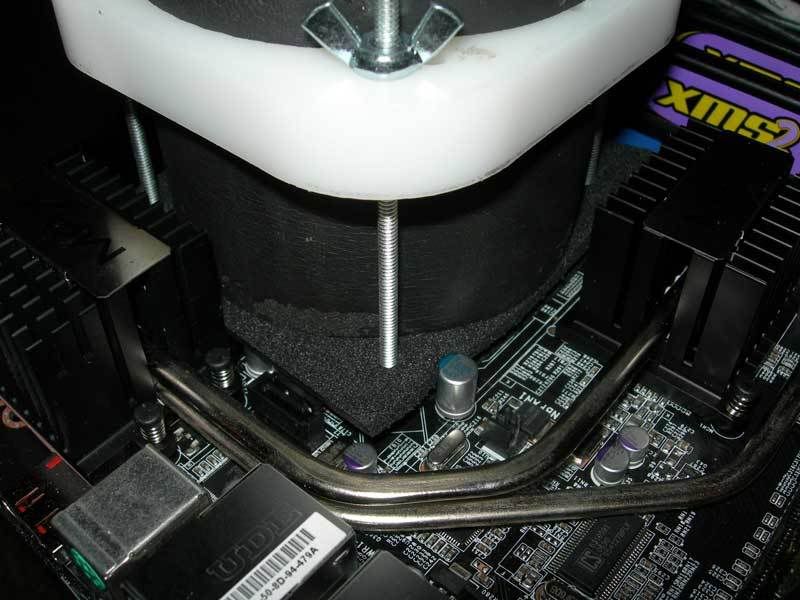
    Yes we need them and we re-solder them back......BUT......in the back of our mobo.......


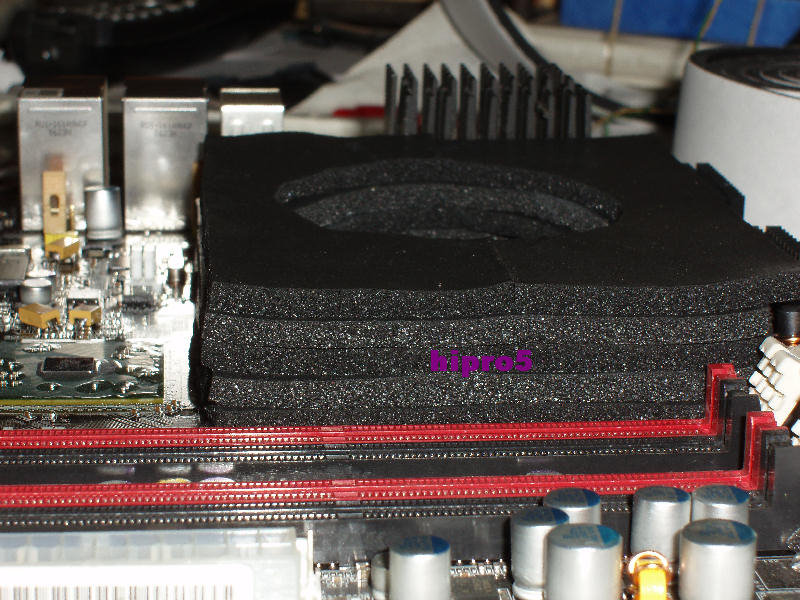
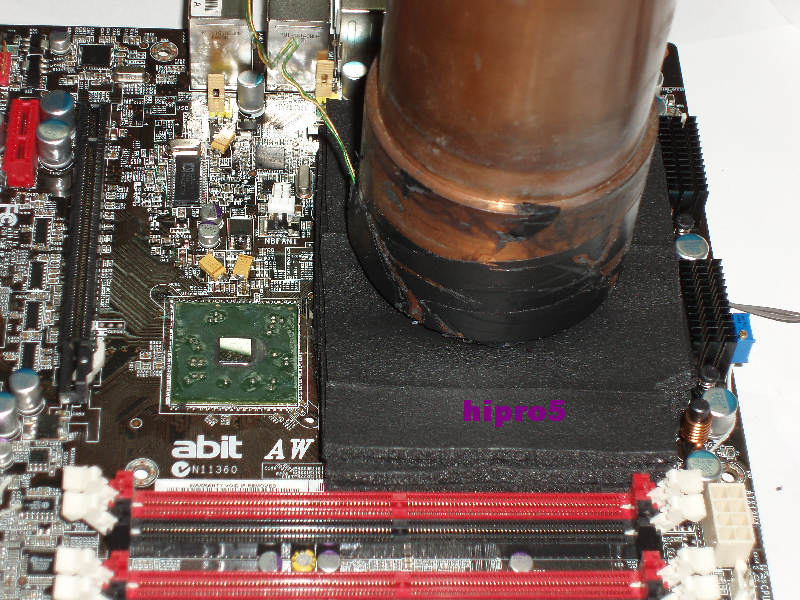
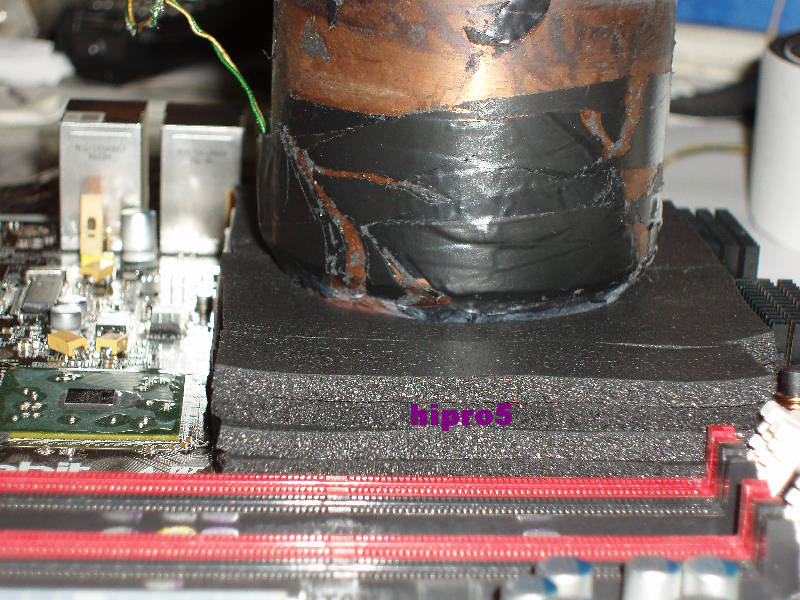
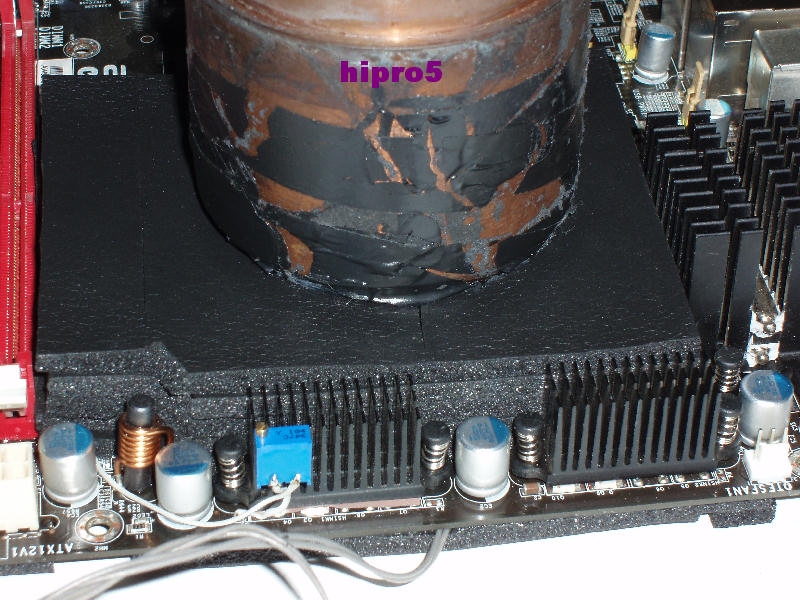
    ....by doing this we have space for PROPER insulation around our socket in case of subzero temps......


    .
    Last edited by hipro5; 10-14-2006 at 06:15 AM.
    INTEL PWA FOR EVER

    Dr. Who my arss...

    .........


  2. #2
    Xtreme Owner Charles Wirth's Avatar
    Join Date
    Jun 2002
    Location
    Las Vegas
    Posts
    11,653
    Very cool, I have been wanting to do this on a few boards.

    Looking forward to how it goes, thanks George.
    Intel 9990XE @ 5.1Ghz
    ASUS Rampage VI Extreme Omega
    GTX 2080 ti Galax Hall of Fame
    64GB Galax Hall of Fame
    Intel Optane
    Platimax 1245W

    Intel 3175X
    Asus Dominus Extreme
    GRX 1080ti Galax Hall of Fame
    96GB Patriot Steel
    Intel Optane 900P RAID

  3. #3
    Xtreme Enthusiast
    Join Date
    Apr 2004
    Location
    Helsinki / Finland
    Posts
    965
    Nice, but same situation with insulation @ backside of mobo, so what is the point?
    - Team Skootterit
    - SuperPi32M : 18m53.156s with FX-57 / LN2 (Ilkkahy's brazed container)
    - SuperPi8M : 3m55.703s with FX-57 / LN2 (Ilkkahy's brazed container)
    - SuperPi1M : 21.484s with FX-57 / LN2 (Ilkkahy's brazed container)


  4. #4
    Xtreme Member
    Join Date
    Mar 2004
    Location
    Portugal
    Posts
    240
    Quote Originally Posted by Dani
    Nice, but same situation with insulation @ backside of mobo, so what is the point?
    Not really he can carve into the insulation material and it´s a lot easier to insulate the background , and the socket area .
    But for that we need to be super hipro5 , for these kind of transformation :P

  5. #5
    Xtreme Addict
    Join Date
    May 2006
    Location
    Philippines ^_^
    Posts
    1,618
    Excellent HIPRO5

    you are really are a modding guru..

    will wait for more of your guides..
    Asus P5W64 WS Professional , DFI Infinity 965P-S (testing)
    X6800 , E6750 es
    Micron Fatbodies , Micron D9gkx oem, Crucial 8000, Crucial Tracer 8500 (incomming)
    Ati FireGL V5100, Elsa FireGL V3100
    water cooling setup (EK 775 cpu block, swiftech NB Block, Swiftech pump, BI dual pass dual 120mm)
    Silverstone OP650
    raptors, baracuda

  6. #6
    This is why your so hardcore man....if the is in your way, you just move it to the backside of the mobo . Gotta try this...

  7. #7
    ¿
    Join Date
    Jul 2003
    Posts
    4,772
    You know what I'm wondering hipro, why don't you just build your own motherboards

  8. #8
    k|ngp|n/Sham my brothers
    Join Date
    Aug 2002
    Location
    Athens---Hellas
    Posts
    5,693
    Thanks guys.....

    @ Dani ....I do so for two reasons: a.Easier and flat insulation in the front with more room and thicker "walls" of insulation and b.inovation...

    Quote Originally Posted by k|ngp|n
    This is why your so hardcore man....if the is in your way, you just move it to the backside of the mobo . Gotta try this...
    Always Vince....always.....

    Quote Originally Posted by G H Z
    You know what I'm wondering hipro, why don't you just build your own motherboards
    Who knows....!.....Maybe sometime I will......
    Last edited by hipro5; 10-14-2006 at 12:16 AM.
    INTEL PWA FOR EVER

    Dr. Who my arss...

    .........


  9. #9
    k|ngp|n/Sham my brothers
    Join Date
    Aug 2002
    Location
    Athens---Hellas
    Posts
    5,693
    Let's continue......

    First off, we "tap" (close) all the holes of the mobo with a soft material (like gum) which actually is for insulation and it was in the package with a Prometia cooling unit ..... Please help me whoever knows how it's called....I think it's called seal string....


    Closer look.....


    Then we go and get a "Plastic Spray" which can handle -70*C so as to be sure that it won't "break" at low temps....I use this one.....


    Afterwards we spray the whole backside of the mobo......We do so if we do not want/like corrosion to our mobo......


    When it "turns" into plastic (from liquid) we turn the mobo to the other side (front) and we start insulating all parts/components of it BUT NOT by spraying them cuz we will encode slot contacting problems if we do so....
    We get a small piece of cotton which we spray it all the time and place it on every component......Like the photos below....


    Last edited by hipro5; 10-13-2006 at 01:20 PM.
    INTEL PWA FOR EVER

    Dr. Who my arss...

    .........


  10. #10
    k|ngp|n/Sham my brothers
    Join Date
    Aug 2002
    Location
    Athens---Hellas
    Posts
    5,693
    When we have finished insulating the mobo with plastic spray, we untap it's holes like the photo.....


    IF we have a thermal resistor, we place it on the back of the CPU.....This resistor produses heat so as our socket to be dry.....I had this resistor from a Prometia cooling system.....


    Then we start to insulate the whole mobo by sticking insulating tape on it......


    We do this 2 times and crossed each tape to other.......Though I haven't finished yet the back side so I'll continue this tomorrow.....

    EDIT:.....back side completed.....

    We now put all screws we want into the holes like the photo below:


    .....and we continue our back side insulation.....


    .....and finally we get this view....

    Last edited by hipro5; 10-14-2006 at 06:19 AM.
    INTEL PWA FOR EVER

    Dr. Who my arss...

    .........


  11. #11
    k|ngp|n/Sham my brothers
    Join Date
    Aug 2002
    Location
    Athens---Hellas
    Posts
    5,693
    Let's insulate now the front side of the mobo and around the CPU socket......
    First stage of insulation


    ...second stage......


    ........third stage......

    IF you observe the insulation, you'll see that it is sticked "crossed".....This is because we don't want the air to come in/goes out from the little "holes" of cuttings .....If we have air in/out, we have WATER as well......


    .....fourth stage and we did something different this time......We did a "circle" so as our pot fit's exactly into the insulation without "bothering" it....


    ....fifth stage and we start making the circle wider and wider on each step.....


    Our final result is below.....


    .....and finaly testing it......


    IF we want to insulate the WHOLE mobo with plastic spray we do as above (in case we are going to play with CrossFire/SLI) OR only around the CPU's socket.......

    That's for now.....To be CONTINUED.....


    EDIT: Our final resault is the below picture.....Ready to bench with DI/LN2 or even a single stage for 24/7.....

    Last edited by hipro5; 01-14-2007 at 03:08 AM.
    INTEL PWA FOR EVER

    Dr. Who my arss...

    .........


  12. #12
    Xtreme Enthusiast
    Join Date
    Apr 2004
    Location
    Helsinki / Finland
    Posts
    965
    Ok, that's just ing amaizing, so great
    - Team Skootterit
    - SuperPi32M : 18m53.156s with FX-57 / LN2 (Ilkkahy's brazed container)
    - SuperPi8M : 3m55.703s with FX-57 / LN2 (Ilkkahy's brazed container)
    - SuperPi1M : 21.484s with FX-57 / LN2 (Ilkkahy's brazed container)


  13. #13
    ¿
    Join Date
    Jul 2003
    Posts
    4,772
    I did mine similar to yours hipro only I did not move any caps I used nail polish on all exposed components front & back of board, especially around the socket base. Two layered socket insulation with top layer fitting the mousepot circumference tightly and sealing caps. Only used with DI so far, might need to do something more drastic for LN2.

    BTW, whats the blue wire doing on the back of your board


  14. #14
    k|ngp|n/Sham my brothers
    Join Date
    Aug 2002
    Location
    Athens---Hellas
    Posts
    5,693
    Quote Originally Posted by G H Z
    BTW, whats the blue wire doing on the back of your board
    It's for geting real VMCH.....No Vdroop inside the mobo anymore.......
    INTEL PWA FOR EVER

    Dr. Who my arss...

    .........


  15. #15
    Xtreme Addict
    Join Date
    Sep 2003
    Location
    Edinburgh - UK
    Posts
    1,334
    I see some tantalum capacitors there George, you using them to stabilise the northbridge supply?

  16. #16
    Xtreme Legend
    Join Date
    Jan 2004
    Location
    Norway
    Posts
    738
    Quote Originally Posted by hipro5
    It's for geting real VMCH.....No Vdroop inside the mobo anymore.......

    rely nice work Hipro!!

    Did you find any Vcore mod too the Abit board yet?
    Regards
    Overklokk

    First in world over 90k in 3D Mark 03 with 90400p
    http://service.futuremark.com/compare?2k3=5160409


  17. #17
    Xtreme Addict
    Join Date
    Nov 2005
    Location
    The Netherlands
    Posts
    2,018
    Daaaayumn
    Waiting to see the results

  18. #18
    k|ngp|n/Sham my brothers
    Join Date
    Aug 2002
    Location
    Athens---Hellas
    Posts
    5,693
    Quote Originally Posted by Johnny Bravo
    I see some tantalum capacitors there George, you using them to stabilise the northbridge supply?
    Yes....and the Vfsb a bit.....

    Quote Originally Posted by Overklokk
    rely nice work Hipro!!

    Did you find any Vcore mod too the Abit board yet?
    I see you don't "search"...

    http://www.xtremesystems.org/forums/...d.php?t=118248

    Quote Originally Posted by TaPaKaH
    Daaaayumn
    Waiting to see the results
    I do too....
    Last edited by hipro5; 10-14-2006 at 03:36 AM.
    INTEL PWA FOR EVER

    Dr. Who my arss...

    .........


  19. #19
    ln2nl
    Join Date
    Jun 2004
    Location
    The Netherlands
    Posts
    1,659
    Well hipro this is why u are a legend

    And u sure are my idol!
    Last edited by Waus-mod; 10-14-2006 at 04:35 AM.
    *EDITed by IFMU*
    Signature Removed by XS Staff for not following XS Policies

    Forum Policies

  20. #20
    Xtreme Member
    Join Date
    May 2005
    Location
    Oslo, Norway
    Posts
    436
    That's crazy insulation man Nice!

  21. #21
    Xtreme Enthusiast
    Join Date
    Oct 2004
    Location
    Athens,Hellas
    Posts
    810
    at last hipro5, time to remember the good old cold nights.
    I have plenty of time this week
    if this is your first night in xtremesystems,
    you have to overclock.

  22. #22
    k|ngp|n/Sham my brothers
    Join Date
    Aug 2002
    Location
    Athens---Hellas
    Posts
    5,693
    Quote Originally Posted by PallMall
    Hipro nice job on the insulation, but i have a question for you

    Aren't there any components on the board who wouldn't disagree with the extreem cold? Or is this just a matter for insulating against water...
    Just a question

    Thanks M8.....

    Look......I haven't encoded cold problems on the components IF the mobo uses good ones....The max temp I've seen with LN2 cooling on mobo's PCB, was -17*C.....So I think they can handle that.....PLUS that now we are not playing at -196*C any more...Just up to -130 to -140*C....

    Quote Originally Posted by Waus-mod
    Well hipro this is why u are a legend

    And u sure are my idol!
    Thank you for your kind words Wouter ....

    Quote Originally Posted by esdee
    at last hipro5, time to remember the good old cold nights.
    I have plenty of time this week
    Yes come here and fix the cascade of yours....

    BTW....A little birdie told me that we'll have 2 x GPU containers for the VGA's too....

    Quote Originally Posted by aasmaukr
    That's crazy insulation man Nice!
    Like me....
    Last edited by hipro5; 10-14-2006 at 06:04 AM.
    INTEL PWA FOR EVER

    Dr. Who my arss...

    .........


  23. #23
    k|ngp|n/Sham my brothers
    Join Date
    Aug 2002
    Location
    Athens---Hellas
    Posts
    5,693
    EDITING the posts above and finished the insulation.....Ready for benching and having a good time cuz that's all it counts.....
    INTEL PWA FOR EVER

    Dr. Who my arss...

    .........


  24. #24
    Xtreme Enthusiast
    Join Date
    Oct 2004
    Location
    Athens,Hellas
    Posts
    810
    Quote Originally Posted by hipro5
    Thanks M8.....
    BTW....A little birdie told me that we'll have 2 x GPU containers for the VGA's too....
    got it

    the second cascade only needs insulation on the flex and an auxiliary fan for the 1st stage condenser since it don't have time to move it over gorillakos place and replace the burned fan.

    just black mail bill to go fill the LN2 dewar


    hey George, those M4 screws look AWFULLY FAMILIAR
    Last edited by esdee; 10-14-2006 at 06:20 AM.
    if this is your first night in xtremesystems,
    you have to overclock.

  25. #25
    k|ngp|n/Sham my brothers
    Join Date
    Aug 2002
    Location
    Athens---Hellas
    Posts
    5,693
    Quote Originally Posted by esdee
    hey George, those M4 screws look AWFULLY FAMILIAR
    Yes.....they are MINE......NOW.....
    INTEL PWA FOR EVER

    Dr. Who my arss...

    .........


Page 1 of 3 123 LastLast

Bookmarks

Bookmarks

Posting Permissions

  • You may not post new threads
  • You may not post replies
  • You may not post attachments
  • You may not edit your posts
  •