-
PSU's 3.3v Rail directly connected to/as vdimm
hi
i have follow situation
- fluctuate and to low vdimm
- 3,3v mod on psu works not on my hec300 lr-pt (link to thread )
theory...:
so i measured long time ago on an other board, and here again...
the vdimm-vrm using the 3,3v rail.
... but has no effect if vdimm-mod is high as possible. so vdimm-vrm is'nt not "in use" because its full through-steered.
only the vrm-own forward voltage (voltage drop) made a "lost" of around 0,15v - 0,25vdimm
for higher vdimm, modify the 3.3v rail is needed.
my thinking was "wy not bridging the vdimm-vrm and connected the 3,3v rail direktly to the dimm-slot."
so i soldered...
the mod:
... is simple. only connect the atx 3,3v (orange wire's) to vdimm-socket. 
no opening trace or removing mosfet etc. is needed.
the wire sould be not to small. a lot of ampere flowing through.
(short calculation: "guess" 20 watt for 2 x 256mb made 6 ampere)
the little problem is: finding the correct pin(s) for vdimm !!!
(or the correct pin (leg) on vdimm-vrm-mosfet or vdimm blocking capacitor)
pro's are:
- stable and strong vdimm, especially under heavy load (memtest86 v3.0 #5)
- some psu's limiting the 3,3v-psu-mod with overvoltage protect.
- my psu (see above) need a deeper mod for upping the 3,3v rail...
- save power and produce less heat on vagp-vrm because 3,3v-rail is not so high.
- no heat on vdimm-vrm 
- easy to mod
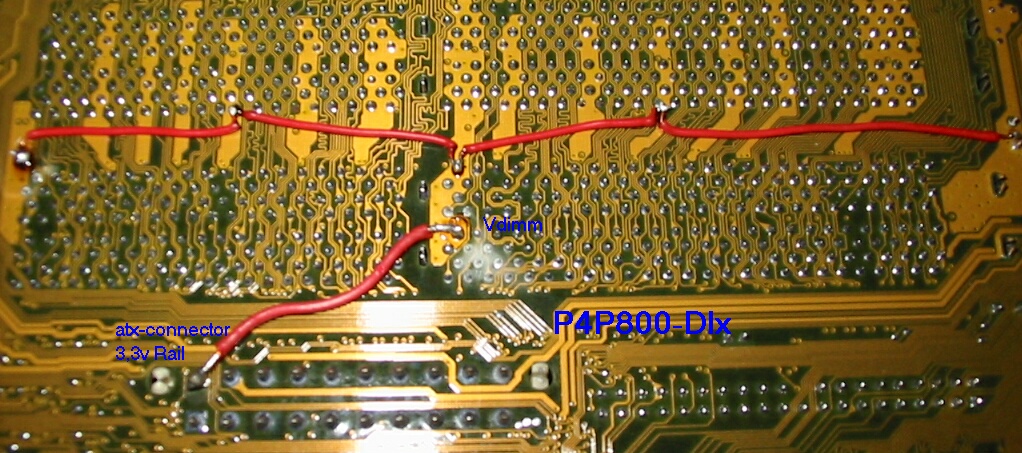
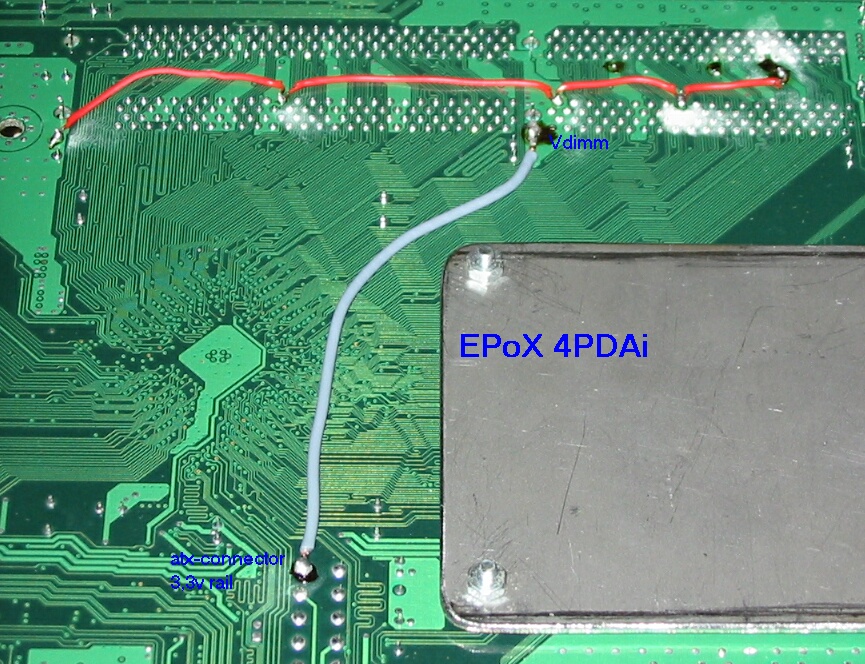
i have done this mod on asus p4p800-dlx and epox 4pdai. (see pics)
the red wire (along the socket) is not needed. it was only for research to "finding the last millivolt".
the vtt rising on both mobos "automatically" to half vdimm.
vdimm is now the same as 3.3vrail.
(fluctuating is pending from psu quality)
for me, in most win-applications 3,31v --> 3,31v and in memtest86 #5 3,31v --> 3,27v (meter on pin7)

again, watch out, vdimm is now possibly stronger and stable as before.
i will try this mod on is7-e too, but for a clean success an vtt mod is required.
Originally posted by enduracell
... I think though that a cap between 3.3 form PSU and groud before go to Vdimm will yield better results...
not needed. around the dimms are enough blocking capacitor's for this.
on p4p800: 3 x 1500µf and 1 x 1000µf
notice to measuring the real vdimm:
often asking... how measuring-point of vdimm ?
bards are differend, but the vdimm socket is every the same. (here for DDR1-Ram)
locate pin7 on any dimm-socket, here is the point to meter.
take a very closer view of socket and find pin 1, printed on it... count from here to pin 7.
disclaimer, disclaimer, blah blah.....
edit: bad english..
edit2: bad english..
edit3: updated/changed line "lost", "guess" and "ddr"
Last edited by Rio71; 06-26-2004 at 11:40 AM.
-  projekt seti-bench @ c4m under 2:00 ::: c4m 2500@3??? ::: 3.0E test'test... :-)
-  P4 2.4B @ 3300 IHS off :: 1,70V mod PAL8942 :: 4x256MB BH-5 DDR460 2-2-2-5-inf-64µs :: P4P800-Dlx
R 8500 @ 295/295--> DVI --> EIZO 15" TFT :: Hitachi 180GXP :: HEC-300LR-PT :: 98SE/XP
- C4m2000 @ 3350 :: 1,70V :: 36°C/51°C mod-Kühler :: DDR441 2-2-2-5 :: IS7-E :: IHS off
- C4m1500 @ 3000 :: 1,7V MCX4000 + TMD :: DDR400 2-2-2-5-infinite-64µs :: 4GEA :: IHS off
- PIII-S 1400 @ 1660 :: 1,45V :: 36°C/40°C/mod Volcano6cu :: TUSL2-C (Mod) (Bios@Mad) :: IHS on :: Bench
- Laptop PIII 700@700 (100FSB/440BX) :: 256MB :: 18Gig Toshiba :: 4MB ATI :: 14,1" TFT :: Win98SE
* Footnote: 90% of all computer problems can you find between chair and keyboard. ;-)
 Posting Permissions
- You may not post new threads
- You may not post replies
- You may not post attachments
- You may not edit your posts
-
Forum Rules


 Reply With Quote
Bookmarks